The term “container” is now widely used throughout the Information Technology (IT) industry. However, there are many different definitions of this depending on which company you talk to.
The purpose of this article is to detail what a Docker container is, what a Cloudhouse Alchemy Compatibility Package is, and the differences between them. It also covers how to deploy a Cloudhouse Compatibility Package using Docker.
Intended Audience
The intended audience of this article is anyone needing to understand:
- The differences between a Cloudhouse Alchemy Compatibility Package and a Docker Container.
- Scenarios for using an Alchemy Compatibility Package Vs a Docker container.
- How to deploy an Alchemy Compatibility Package using Docker.
- Systems Integrators, Partner and Customer organisations.
An Introduction to Docker and Alchemy Compatibility Packages
This section provides an introduction to Docker and Alchemy Compatibility Packages.
What is a Docker Container?
Docker has the concept of a container which they define as:
“A container is a standard unit of software that packages up code and all its dependencies so the application runs quickly and reliably from one computing environment to another. A Docker container image is a lightweight, standalone, executable package of software that includes everything needed to run an application: code, runtime, system tools, system libraries and settings.”
Put simply; a Docker container is an abstraction at the application layer that contains the application and everything it needs including the relevant version of an operating system. This differs from a virtual machine (VM) which is an abstraction of physical hardware that allows one physical computer to run many virtual machines, each with its own operating system.
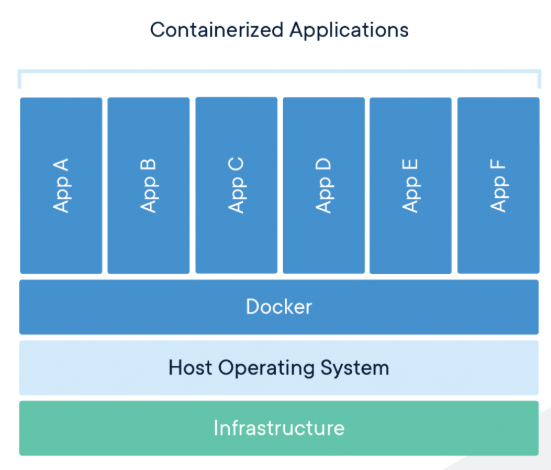
Docker containers have a base operating system image on top of which you can define configuration changes such as installing applications, making system changes, and so forth. Multiple Docker containers can be run on the same host, isolated from each other as they are only exposed to the ports you configure.
What is a Cloudhouse Alchemy Compatibility Package?
A Cloudhouse Alchemy Compatibility Package (previously known as a Compatibility Container™), includes everything an application needs to run on a modern operating system, including all the application files, runtimes, components, deployment tools, and the embedded redirection and compatibility engine — basically, the application and everything it needs, except the operating system.
Why use a Docker container rather than an Alchemy Compatibility Package?
The benefits of Docker are primarily in orchestration, scale, and consistency. Docker allows an organisation to view its software as distinct, isolated images of applications and services, without having to worry about which host or server they are running on.
Why use an Alchemy Compatibility Package rather than a Docker container?
Alchemy Compatibility Packages are designed to solve compatibility issues between the application and the operating system. Our Compatibility Packages are treated the same as any applications running on Windows and are therefore not affected by the technology used to run the guest operating system.
Why use both a Docker and an Alchemy Compatibility Package?
Using a combination of Docker and Alchemy Compatibility Packages allows you to run application and operating system combinations that would otherwise be technically impossible. This increases the number of supported environments/applications and operating system combinations to help organisations migrate their legacy applications to more modern operating systems or the cloud.
In this document, we use the example of SQL 2005 which is unsupported on Windows Server 2019. However, by containerising SQL 2005 into an Alchemy Compatibility Package, it is then possible to run it on a Windows Server 2019 Docker container.
When you run an Alchemy Compatibility Package inside a Docker container, the architecture is as shown below.

Do Docker containers have any limitations?
The base Windows Server image used for Docker containers is based on Windows Server Core which does not include any graphical user interface (GUI) components. You will therefore be unable to run any applications that require GUI components in a Docker container.
Running an Alchemy Compatibility Package within a Docker container
This section details how to run an Alchemy Compatibility Package within a Docker container.
Prerequisites
To run an Alchemy Compatibility Package within a Docker container, you need:
- The Alchemy Compatibility Package containing the packaged application.
- The relevant operating system image for the Docker container (we recommend using the ISO of Windows Server 2019 core).
- Docker Desktop/Enterprise installed, depending on where you plan to run the Docker container.
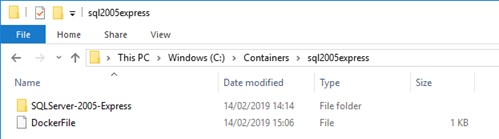
Creating the Staging Folder
Create a folder on the computer where the Docker and the Alchemy Compatibility Package are to be run. In our example, this is C:\Containers\SQL2005express.
Copy the Alchemy Compatibility Package to the Staging Folder
Copy the Alchemy Compatibility Package containing SQL 2005 to the staging directory (C:\Containers\SQL2005express in our example).
You should now have the following structure:
Modifying the Alchemy Compatibility Package to run on Docker
For an Alchemy Compatibility Package to run on Docker, the following modifications are required:
- Navigate to the folder containing the Alchemy Compatibility Package.
- Open the Programs.xml in an editor such as Notepad++.
- Change the value of the <WaitCondition TimeoutInSeconds="0"> line for the executable that is to be run in the Container from None to Exit. In our example, we are changing this for AppAcceleratorV.exe (which is the executable used to run the Cloudhouse Container), which in turn runs SQL Server.

- Save the file.
Creating the Docker File
The Docker container is built and configured based on the Docker configuration stored in the DockerFile configuration file. This file is required for each Docker container. However, the same DockerFile can be used for more than one Docker container.
Create this file as a text file with no file extension in the staging folder (C:\Containers\SQL2005express in our example). The contents of this file for our example are shown and explained below.
| Line | Description |
| FROM mcr.microsoft.com/windows/servercore:latest | The source location of the base Docker image, which in this case is coming from the Microsoft Container Registry, so it is an official Microsoft image. |
| RUN mkdir C:\cloudhouse | Run the command to create the C:\cloudhouse folder in the Docker container. |
| COPY . C:\\cloudhouse |
Copy the files from the current local folder into the location specified within the Docker container. |
| WORKDIR C:\\cloudhouse\\SQLServer-2005-Express |
Set the working directory to C:\\cloudhouse\\SQLServer-2005-Express |
| RUN Cloudhouse.Container.Deployment.exe --deploydir C:\deployed_containers --accepteula |
Run the command to deploy the Cloudhouse Container within the Docker container. |
| WORKDIR C:\\deployed_containers\\SQLEX2005_5305 |
Changes the working directory to the location of the deployed Container so that when the Docker container is run, the Run command runs from the correct folder. |
| EXPOSE 49252 |
This is the port that can be used to communicate with the Docker container. |
| CMD ["Cloudhouse.Container.Run.exe"] |
Tells the Docker container what it should do when it has finished loading, which in our case is to run the Cloudhouse Container. |
Creating and Running the Docker container
This section details how to create and run the Docker container.
Creating the Docker container
To create the Docker container:
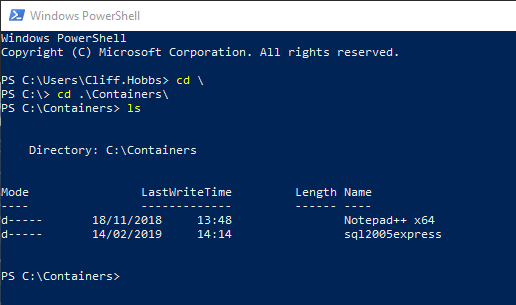
- Sign in to the computer where the Docker container is to be created.
- Start Windows PowerShell.
- Change to the Staging Folder (C:\Containers\SQL2005express in our example).
- Type ls to see a list of existing Docker containers.
- Now type docker image ls to see which Docker images are already on the computer.

- Check to see if the image referenced in the first line of the DockerFile is present. If it is not, then Docker downloads it in the next step which could take an extended period given the size of the file.
- Next type docker build -t <name> . where <name> is the name you wish to tag this Docker image with (which has to be lowercase). For example:
docker build -t cloudhouse_sql2005 .
Note
Using the -t switch (which means tag) is optional. Don’t forget to add the full stop (.) at the end of this command which specifies the current folder as the location that contains the required resources.
If the required Docker image is not present, it is downloaded now which can take an extended period. Once the image has been downloaded and extracted, the Pull complete messages are displayed beside each file.
The actions defined in the DockerFile are then executed in the order specified.
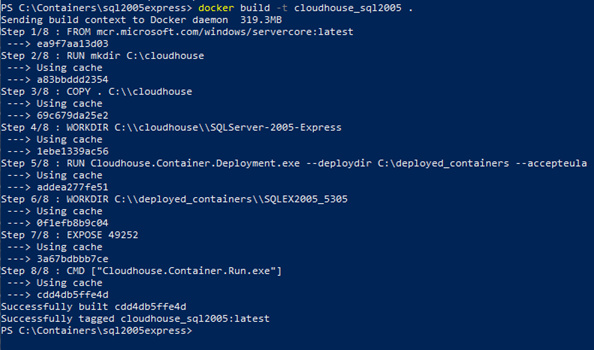
Once the container is successfully constructed, the Successfully built <image_ID> message is displayed, and the PowerShell prompt is redisplayed.
- Run the docker image ls command which now shows the new Docker container.

Now the Docker container has been successfully built; it can be run.
Running the Docker container
To run the Docker container:
- Open Windows PowerShell (if it isn’t already).
- Use the docker run <options> <image_name> command to run the Docker container where <options> are any parameters (optional and required) that need to be specified and <image_name> is the name of the image file created earlier.
For our example we run:
docker run -dP --name cloudhousesql cloudhouse_sql2005
In this example, -d means run in detached mode, and P means publish all. The –name option (which is prefixed with two dashes (--)) is optional and allows you to specify a name for the container (cloudhousesql in this example). Although this is not required, we strongly recommend specifying a name to make working with the container easier. If a name is not specified, Docker allocates a random name to the container every time it is loaded.
cloudhouse_sql2005 in this example is the name of the Docker image.

- Run the docker container ls command to verify the container is running.

Notice that each time you run the Docker container, it assigns a new port mapping. The screenshot below shows that port 56000 on the local computer maps to port 49252 inside the container. Also notice in the screenshot below, that as a name was not specified for the container, Docker allocated the random name flamboyant_feistel which needs to be used to manage the container. This name also changes if you stop the container and start it again but don’t specify a name.

Stopping the Docker container
To stop a Docker container:
- Start Windows PowerShell.
- Type docker container ls to see a list of containers running on this computer.

- Make a note of the name of the relevant container you wish to stop (cloudhousesql in the above screenshot).
- Run the docker stop <docker_container_name> where <docker_container_name> is the name of the Docker container you want to stop. For example:
docker stop cloudhousesql

- Run the docker container ls command to verify the container is no longer running

Deploying the Docker container
Deployment is considered a client-specific programme activity. Therefore, this is developed as a specific use case in a client’s migration or transformation programme.
Please contact us if you require any assistance.